
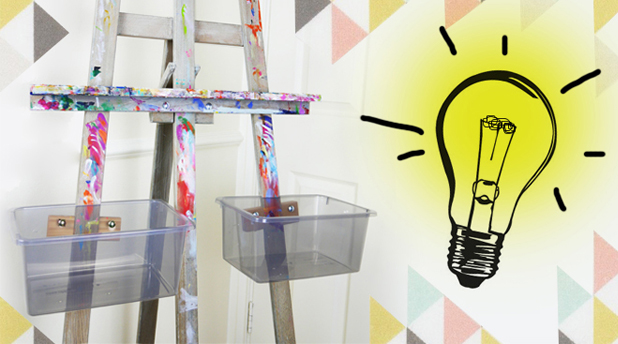
How to make your own Easel Basket
If you want to have more free hands professional fine artist, Amylee offers you a very easy idea to have brushes and colours ready on your easel. Here’s her hanging basket tutorial!
Material for making a hanging basket:
- 1 wooden easel
- 1 transparent plastic storage box. Cardboard, wicker, mesh, or wood (if you have a drill) can also be used for pretty hanging baskets.
- 1 permanent marker
- 1 cutter, 1 knife
- 1 cutting pliers
- 1 spirit level
- 1 screw driver
- 1 canvas holder + 1 clamping kit
NOTICE: The canvas holder has its own clamping kit (2 threaded metal head screws + 2 steel washers + 2 wing nuts)
Most of the items are available at GreatArt (Shopping in London Shoreditch or online).
The Canvas Holder
a) How to use the canvas holder?
As standard, study easels have a removable sliding canvas holder on the middle bar. This holder retains the top of the canvas. I don’t use these personally, only the back support.
b) How to adjust the canvas holder?
The canvas holder is made of 2 wooden parts held by 2 wing screws. In this tutorial, I will only use the back of the canvas holder to hang my basket.
For 2 baskets, you need 2 canvas holders
STEP 1 – Creation of the basket:
I put the back of the canvas holder on one leg of my easel. If you notice, the feet of an easel are always inclined towards the outside, so my canvas holder will not be horizontal but slightly angled.
I then take a plastic box. Using a spirit level I adjust my basket to make it parallel to the floor.
Once my level is stabilized, I put my basket in the middle of the easel leg.
STEP 2 – Drilling of the basket:
My box is transparent, so it is very easy to see the holes in the canvas holder. Using a marker I trace 4 marks.
MARKS 4 & 3: The plastic of the box is rather thin, a screwdriver tip will be perfect for creating a hole. This can be enlarged with a knife.
NOTICE: The hole should be wide enough to allow the threaded screws to pass through.
MARKS 2 & 1: Using cutting pliers, I cut the edge of the plastic box: only the part between the 2 marks. This allows the basket to sit flush on the leg the easel.
Insert the 2 screws into the holes. And there we are, my basket is ready to go on the easel.
STEP 3 – Hanging the basket:
Put the leg of the easel (as a sandwich) between the basket and the canvas holder.
As shown in the picture, be sure to tighten everything by adding washers and wing nuts.
NOTICE: When tightening, the wall of the plastic can be slightly deformed, this is normal. Avoid tightening too much so you don’t break the box.
The basket is ready!
Here are the 2 great hanging baskets completely installed. If necessary, they can be adjusted or removed.
Tip – Very clever!
To hang the basket, it is best to use full threaded screws (see steel screws below). The partially threaded screws (example gold screw below) do not always allow tightening completely if the box is too thin.
NOTICE: Do you have only partially threaded screws? If you want to add thickness, you can use additional metal washers or turn the canvas holder as shown in the picture below:
The content for this post was provided by professional fine artist, Amylee. You can visit her colourful portfolio or follow her Facebook page.
Follow GreatArt Magazine on:
Find all the products on GreatArt Online or in our new art supply shop in London Shoreditch!


Add comment